
Table Of Contents
- 1 Coiling Your Creativity: A Detailed Introduction to Clay Coil Building Techniques
- 1.1 Understanding Clay Coil Building Techniques
- 1.2 Essential Tools:
- 1.3 Additional Materials:
- 1.4 Understanding the Properties of Clay:
- 1.5 Shaping Your Vision: Mastering Fundamental Clay Coil Building Techniques
- 1.6 1. Preparing the Clay:
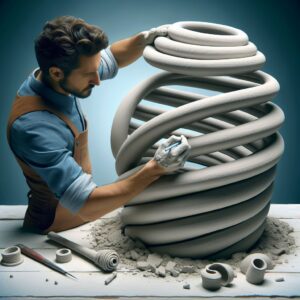
- 1.7 2. Building the Coils:
- 1.8 3. Shaping and Adding Details:
- 1.9 4. Finishing Touches:
- 1.10 Conclusion
- 1.11 Key Takeaways:
- 1.12 FAQs:
Coiling Your Creativity: A Detailed Introduction to Clay Coil Building Techniques
Clay coil building offers a mesmerizing and accessible art form, allowing you to transform simple ropes of clay into intricate sculptures and functional objects. This time-honored technique, employed by cultures for centuries, continues to captivate artists of all skill levels with its versatility and potential for creative expression.
Unlike other sculpting methods that involve carving away from a solid block of clay, coil building involves adding material incrementally, shaping long coils of clay and joining them together to build form and volume. This additive approach offers numerous advantages, particularly for beginners:
1. Control and Precision: Each coil can be individually manipulated and adjusted, offering greater control over the final shape and allowing for intricate details.
2. Flexibility and Correction: Mistakes can be easily corrected by adding or removing clay, making it a forgiving method for learning and experimentation.
3. Gradual Progress: Building piece by piece allows for a more measured and meditative approach to sculpting, fostering focus and mindfulness.
4. Diverse Possibilities: The technique allows for the creation of a vast array of objects, from simple bowls and figurines to complex sculptures and large-scale installations.
Clay coil building is more than just a technique; it’s a journey of exploration and self-discovery. The tactile sensation of manipulating the clay, the rhythmic process of adding coil upon coil, and the satisfaction of witnessing your vision come to life can be immensely rewarding.
Understanding Clay Coil Building Techniques
Having explored the captivating world of clay coil building, let’s shift our focus to the practical aspects of bringing your creative vision to life. This session will unveil the essential tools and materials you need to navigate your artistic journey.
Essential Tools:
- Clay: Choose a smooth, pliable clay suitable for coil building. Popular options include stoneware, earthenware, and polymer clay.
- Rolling pin: Used to roll out the clay into flat sheets for slab construction or to create even and consistent coils.
- Sculpture knives and tools: Used for cutting, shaping, and joining the coils, adding details, and smoothing surfaces.
- Scoring tool: Used to roughen the surface of the clay to enhance adhesion between coils.
- Sponges and water: Used for smoothing surfaces, blending seams, and keeping the clay moist.
- Ribs and spatulas: Used for shaping the clay, smoothing curves, and adding texture.
- Toothpicks or needle tools: Used to create small holes, add delicate details, and release trapped air bubbles.
- Work surface: Choose a smooth, non-porous surface like a ceramic tile or a piece of glass.
Additional Materials:
- Texture mats and stamps: Used to add decorative textures and patterns to the clay surface.
- Armatures: Used as internal support structures for larger sculptures.
- Glazes and paints: Used to add color and finish to your completed sculptures.
Understanding the Properties of Clay:
- Plasticity: Clay’s ability to be molded and shaped without cracking allows for easy manipulation during coil building.
- Drying rate: Different clays have varying drying rates, which can affect the working time and require adjustments in technique.
- Shrinkage: Clay shrinks as it dries, so factor in this shrinkage when planning your project size.
These essential tools and materials, combined with a basic understanding of clay properties, provide a solid foundation for your coil building journey.
Shaping Your Vision: Mastering Fundamental Clay Coil Building Techniques

Armed with the essential tools and understanding of clay properties, we’re now ready to embark on the exciting journey of mastering clay coil building techniques. This session will guide you through the fundamental steps and tips to transform your creative vision into tangible form.
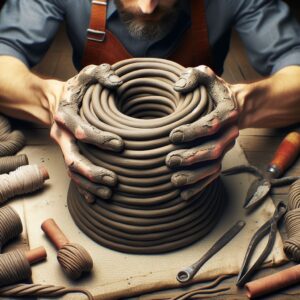
1. Preparing the Clay:
- Wedging: This process removes air bubbles and ensures even moisture distribution, resulting in smooth and consistent coils.
- Rolling: Roll out the clay into flat sheets for slab construction or cut it into smaller pieces for creating coils.
- Scoring and Slipping: Roughen the surface of the clay and apply slip (thin clay paste) to enhance adhesion between coils.
2. Building the Coils:
- Forming: Roll the clay into long, even coils of desired thickness. Consistency is key for smooth joining and a cohesive final form.
- Attaching: Gently press the coils together, ensuring good contact and eliminating air pockets. Use slip or scoring to strengthen the bond.
- Blending: Smooth the junctions between coils using your fingers, ribs, or sponges to create a seamless and unified surface.
3. Shaping and Adding Details:
- Sculpting: Once the basic structure is built, use various tools and techniques like pinching, poking, and carving to refine the shape and add details.
- Adding Texture: Experiment with texture mats, stamps, and found objects to create unique textures and patterns on the clay surface.
- Embellishments: Incorporate additional materials like beads, shells, or metal elements to enhance the visual appeal and personalize your creation.
4. Finishing Touches:
- Smoothing: Take time to carefully smooth all surfaces with sponges, ribs, and fine-grit sandpaper for a polished finish.
- Drying: Allow the clay to dry thoroughly before firing. Follow the manufacturer’s instructions for specific drying times and temperatures.
- Glazing and Painting: Once fired, you can apply glazes or paints to add color, depth, and a protective finish to your artwork.
Remember: Coil building is a journey of exploration and experimentation. Don’t be afraid to try new techniques, embrace mistakes as learning opportunities, and let your creativity flow freely.
Conclusion
As we bring our exploration of clay coil building to a close, let’s solidify key takeaways and address frequently asked questions to equip you with the knowledge and confidence to embark on your creative journey.
Key Takeaways:
- Clay coil building offers a versatile and accessible sculpting technique, allowing you to build intricate forms and functional objects by adding coils of clay incrementally.
- This additive approach provides greater control and precision, allowing for correction of mistakes and gradual progress, making it suitable for beginners and experienced artists alike.
- Essential tools like rolling pins, sculpting knives, sponges, ribs, and toothpicks, combined with appropriate clay and knowledge of its properties, form the foundation for successful coil building.
- Fundamental techniques like preparing the clay, forming and attaching coils, shaping and adding details, and finishing touches are crucial steps in creating beautiful and unique sculptures.
- Experimentation, embracing mistakes as learning opportunities, and letting your creativity flow freely are key drivers for artistic growth and self-discovery in coil building.
FAQs:
1. What type of clay is best for coil building?
Stoneware and earthenware offer good workability and durability for coil building. Polymer clay is another option, providing flexibility and oven-bake convenience.
2. How thick should the coils be?
Consistency in coil thickness is essential for a seamless final form. Aim for even thickness, typically between 1/4 inch and 1/2 inch, depending on the size of your project.
3. How do I prevent cracks from forming?
Wed the clay thoroughly and score and slip the surfaces before joining coils to ensure good adhesion. Avoid overworking the clay and allow it to dry slowly and evenly.
4. Can I use recycled clay for coil building?
Yes, you can recycle clay scraps for coil building. However, ensure the clay is free of air bubbles and debris for optimal results.
5. Where can I find inspiration for my coil building projects?
Explore online galleries, pottery books and magazines, and social media communities dedicated to ceramics and coil building for endless inspiration and creative ideas.
Clay coil building is a rewarding and enriching art form that offers endless creative possibilities. By embracing its versatility, mastering fundamental techniques, and allowing your imagination to guide you, you can embark on a fulfilling journey of artistic expression and self-discovery.
Remember, the most important tool in coil building is your own creativity. So, gather your supplies, unleash your imagination, and start building your unique artistic vision with clay coils.