
Table Of Contents
- 1 Unveiling Your Creativity: Introduction to Clay Sculpture Ideas for Beginners
- 1.1 Why Clay Sculpture?
- 1.2 Unlocking Creative Potential: Clay Sculpture Ideas for Beginners
- 1.3 Demystifying the Process: Meaning and Tools for Clay Sculpting Beginners
- 1.4 Meaning of “Clay Sculpture Ideas for Beginners”:
- 1.5 Essential Tools for Beginners:
- 1.6 Fundamental Techniques:
- 1.7 Shaping Your Vision: Step-by-Step Projects and Helpful Tips for Beginners
- 1.8 Project 1: Pinch Pot
- 1.9 Project 2: Leaf Sculpture
- 1.10 Instructions:
- 1.11 Helpful Tips for Beginners:
- 1.12 Conclusion
- 1.13 Key Takeaways:
- 1.14 FAQs:
Unveiling Your Creativity: Introduction to Clay Sculpture Ideas for Beginners
Clay sculpting offers a captivating and enriching art form, inviting individuals of all ages and skill levels to explore their creativity and find joy in the transformative power of clay. For beginners, however, the vastness of possibilities and unfamiliar techniques can feel overwhelming. This session aims to provide a detailed introduction to clay sculpture ideas for beginners, igniting your artistic passion and guiding you towards your first creative clay project.
Why Clay Sculpture?
Clay sculpting offers several benefits for individuals of all backgrounds:
- Enhanced Creativity: Shaping clay encourages out-of-the-box thinking, problem-solving, and exploration of diverse textures and forms, fostering a vibrant artistic mindset.
- Improved Fine Motor Skills: Manipulating the clay strengthens hand and finger muscles, promoting dexterity and coordination, which benefit daily life activities.
- Stress Reduction: The repetitive nature of shaping and molding clay has a calming effect, providing a therapeutic outlet to reduce stress and anxiety.
- Sense of Accomplishment: Completing a clay sculpture, regardless of complexity, boosts self-confidence and provides a tangible sense of achievement.
- Mindfulness and Focus: The focused attention required for sculpting improves concentration and promotes a mindful state, offering a respite from daily distractions.
- Fun and Enjoyable: Clay sculpting is an inherently fun and engaging activity, allowing individuals to express their creativity and experience the joy of shaping clay into unique and meaningful objects.
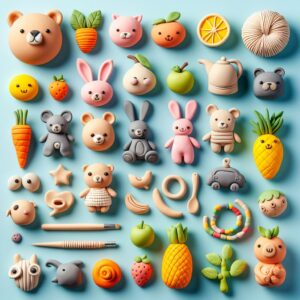
Unlocking Creative Potential: Clay Sculpture Ideas for Beginners
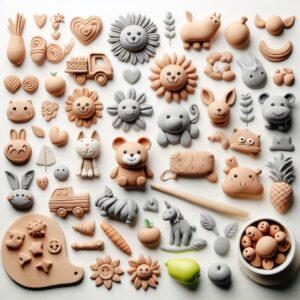
- Simple Forms: Start with basic shapes like pinch pots, spheres, or coils to gain confidence and master fundamental sculpting techniques.
- Nature-Inspired Creations: Sculpt leaves, flowers, fruits, or animals to draw inspiration from the natural world and explore organic shapes and textures.
- Abstract Sculptures: Experiment with abstract forms and textures, focusing on lines, curves, and negative space to create unique and expressive pieces.
- Functional Objects: Sculpt bowls, mugs, coasters, or jewelry holders to combine artistic expression with practical utility.
- Sculpted Portraits: Challenge yourself with sculpting portraits of yourself, loved ones, or historical figures, exploring facial features and expressions.
- Collaborative Creations: Work with friends or family on a collaborative project, sharing ideas, techniques, and creating a unique piece together.
Beyond these ideas, the possibilities are endless! Let your imagination guide you as you explore different techniques, materials, and textures. Don’t be afraid to experiment, make mistakes, and discover your unique artistic voice through the transformative power of clay.
Demystifying the Process: Meaning and Tools for Clay Sculpting Beginners
As we continue our exploration of clay sculpture ideas for beginners, let’s delve deeper into the meaning of this artistic pursuit and equip you with the essential tools and techniques to confidently embark on your creative journey.
Meaning of “Clay Sculpture Ideas for Beginners”:

This term encompasses a broad spectrum of ideas and resources specifically designed to empower individuals with little to no clay sculpting experience. It goes beyond simply providing project suggestions; it fosters a supportive and encouraging environment where beginners can explore their artistic potential without feeling overwhelmed or intimidated.
Essential Tools for Beginners:
- Sculpting Clay: Choose a clay type that suits your project and skill level. Polymer clay and air-dry clay are good options for beginners due to their ease of manipulation.
- Sculpting Tools: A basic set of tools should include sculpting knives, loop tools, texture tools, and sponges for smoothing.
- Rolling Pin: This tool helps you roll out clay evenly for slab building and creating flat surfaces.
- Water Spray Bottle: Use water to keep your clay moist and prevent cracking.
- Work Surface: Choose a smooth, non-porous surface like a ceramic tile or glass to protect your work area.
Fundamental Techniques:
- Pinch Potting: This technique involves pinching a ball of clay to create a hollow form, ideal for beginners to practice basic shaping skills.
- Coil Building: Create long coils of clay and join them together to build larger and more complex forms.
- Slab Building: Roll out clay into flat sheets and cut or mold them into desired shapes for creating tiles, boxes, or other flat objects.
- Texturing: Add texture to your sculptures using tools or found objects to create visual interest and depth.
- Glazing: Apply glaze (for certain clay types) to your finished sculpture for a smooth finish and added color or visual effects.
By understanding the meaning and acquiring the essential tools and techniques, beginners can embark on their clay sculpting journey with confidence and enthusiasm. Remember, there’s no right or wrong way to create clay sculptures. Embrace the process of learning, experiment with different techniques, and most importantly, have fun while expressing your unique artistic vision through the transformative power of clay.
Shaping Your Vision: Step-by-Step Projects and Helpful Tips for Beginners
Equipped with the knowledge of tools and techniques, let’s dive into the practical realm of clay sculpting for beginners. This session will guide you through step-by-step instructions for creating two simple projects, offering helpful tips and tricks to enhance your artistic journey.
Project 1: Pinch Pot
Materials:
- Polymer clay or air-dry clay
- Water spray bottle
- Sculpting tools (optional)
Instructions:
- Roll a ball of clay between your palms until smooth.
- Pinch your thumb into the center of the ball, creating a hole.
- Gradually widen and deepen the hole, thinning the walls of the pot with your fingers or sculpting tools.
- Smooth the edges and shape the rim of your pot.
- Use sculpting tools to add details or textures (optional).
- Allow your pot to air-dry or bake it according to the clay instructions.
Project 2: Leaf Sculpture
Materials:
- Polymer clay or air-dry clay
- Rolling pin
- Leaf template (optional)
- Sculpting knife
- Water spray bottle
- Texture tools (optional)
Instructions:
- Roll out a flat sheet of clay using a rolling pin.
- Place your leaf template on the clay (optional) or freehand draw the outline of a leaf.
- Cut out the leaf shape using a sculpting knife.
- Use your fingers or sculpting tools to add details and texture to the leaf veins and edges.
- Add additional details like holes, tears, or curled edges for a more realistic look.
- Allow your leaf sculpture to air-dry or bake it according to the clay instructions.
Helpful Tips for Beginners:
- Start small: Don’t overwhelm yourself with complex projects initially. Begin with simple forms and gradually progress to more intricate designs.
- Practice basic techniques: Master fundamental techniques like pinch potting, coil building, and slab building before attempting advanced projects.
- Keep your clay moist: Use a water spray bottle to prevent your clay from drying out and cracking.
- Work on a smooth surface: Choose a non-porous surface like a ceramic tile or glass to protect your work area and prevent your clay from sticking.
- Take breaks: Avoid fatigue and frustration by taking breaks when needed. Remember, patience and practice are key to developing your sculpting skills.
- Don’t be afraid to experiment: Try different tools, techniques, and textures to discover what works best for you. The most important thing is to have fun and enjoy the creative process.
- Seek inspiration: Look at other artists’ work, visit museums and exhibitions, and browse online resources for inspiration and ideas.
- Join a community: Connect with other clay sculptors online or in person to share experiences, learn from each other, and receive feedback on your work.
By following these tips and practicing regularly, you’ll be well on your way to mastering the art of clay sculpting. Remember, there’s no right or wrong way to create art. Embrace your unique artistic vision, express yourself freely through the transformative power of clay, and enjoy the journey of becoming a skilled clay sculptor.
Conclusion
As we conclude our exploration of clay sculpture ideas for beginners, let’s solidify key takeaways and address frequently asked questions to equip you with the knowledge and confidence to embark on your creative journey.
Key Takeaways:
- Clay sculpting offers an enriching and rewarding artistic outlet for beginners, fostering creativity, improved fine motor skills, stress reduction, a sense of accomplishment, mindfulness, and joy in the process of shaping clay.
- Understanding the meaning of “clay sculpture ideas for beginners” emphasizes the importance of accessible resources, supportive environments, and beginner-friendly techniques to empower individuals with limited experience.
- Acquiring essential tools like sculpting clay, sculpting tools, rolling pin, water spray bottle, and a smooth work surface enables beginners to confidently approach their projects.
- Mastering fundamental techniques like pinch potting, coil building, slab building, texturing, and glazing provides a solid foundation for exploring more advanced techniques and creating complex sculptures.
- Following helpful tips like starting small, practicing regularly, seeking inspiration, and joining a community fosters a positive learning experience and enhances your artistic development.
FAQs:
1. What type of clay is best for beginners?
Polymer clay and air-dry clay are recommended for beginners due to their ease of manipulation and forgiving nature. Polymer clay requires baking for hardening, while air-dry clay air-dries at room temperature within 24-48 hours.
2. Do I need to purchase expensive tools to get started?
Basic sculpting tools like sculpting knives, loop tools, texture tools, and sponges can be purchased at affordable prices. Alternatively, you can use household items like spoons, forks, and toothpicks for initial exploration.
3. How do I avoid my clay from drying out?
Keep your clay wrapped in plastic wrap or a damp cloth when not in use. Use a water spray bottle to rehydrate your clay if it starts to dry out while sculpting.
4. What should I do if I make a mistake?
Don’t worry! Mistakes are part of the learning process. Simply smooth out the clay and start again. You can also use your mistakes as opportunities to experiment and discover new techniques.
5. Where can I find inspiration for my clay sculptures?
Look at images of other clay sculptures online or in books, visit museums and exhibitions, and explore nature for inspiration. Pay attention to shapes, textures, and details that resonate with you.
Embarking on your clay sculpting journey as a beginner can be an exciting and fulfilling experience. By understanding the key takeaways, utilizing the resources provided, and incorporating the helpful tips, you can overcome initial challenges, develop essential skills, and discover the joy of expressing yourself through the transformative power of clay. Remember, there are no limits to your creativity! So, gather your materials, unleash your imagination, and start shaping your vision with clay.