Table Of Contents
- 1 Session 1: Sculpting Your Vision: The Crucial Role of Armatures in Clay Sculptures
- 1.1 What is an Armature?
- 1.2 The Benefits of Using an Armature:
- 1.3 Types of Armatures:
- 1.4 Session 2: Building Your Foundation: Demystifying Armature Construction
- 1.5 Understanding Armature Construction Principles:
- 1.6 Essential Tools and Materials:
- 1.7 Building Your Armature Step-by-Step:
- 1.8 Session 3: Sculpting with Confidence: Mastering the Art of Clay Application
- 1.9 Clay Application Techniques:
- 1.10 Clay Considerations:
- 1.11 Sculpting Specific Forms:
- 1.12 Enhancing Your Armature Sculpting Skills:
- 1.13 Session 4: Cultivating Your Clay Sculpting Journey: FAQs and Resources
- 1.14 FAQs:
- 1.15 Q: What type of wire is best for armatures?
- 1.16 Q: How do I secure the clay to the armature?
- 1.17 Q: How long does it take for air-dry clay to dry completely?
- 1.18 Q: Can I bake polymer clay on my armature?
- 1.19 Q: Where can I find more inspiration and learning materials?
Session 1: Sculpting Your Vision: The Crucial Role of Armatures in Clay Sculptures
Have you ever dreamt of crafting a clay masterpiece, but felt intimidated by the prospect of maintaining its shape and structure? Fear not, aspiring clay sculptor! For within the realms of clay creation lies a hidden hero – the armature. This session delves into the world of armatures, revealing their significance and empowering you to confidently embark on your sculpting journey.
What is an Armature?
An armature is the unseen backbone of a clay sculpture. It provides a sturdy framework that supports the clay, allowing it to maintain its desired form while you sculpt. Without an armature, your clay creation would likely slump, collapse, or lose its shape, especially in larger or more intricate pieces.
The Benefits of Using an Armature:
Beyond providing structural support, armatures offer numerous benefits to clay sculpting:
- Shape and Proportion: Armatures help you establish the basic shape and proportions of your sculpture, ensuring accuracy and consistency.
- Posing and Expression: A well-crafted armature allows you to create dynamic poses and expressive gestures in your sculptures, bringing your characters and creations to life.
- Flexibility and Control: You can easily bend and shape the armature to achieve the desired form and pose, allowing for greater control over your sculpting process.
- Durability and Stability: A strong armature provides stability and ensures the longevity of your sculpture, preventing cracks, sagging, or damage over time.
Types of Armatures:
The ideal armature material depends on the size and complexity of your sculpture. Here are some popular options:
- Wire: A versatile and readily available material, wire offers flexibility and strength, perfect for creating armatures of various sizes and shapes.
- Wood: For larger or heavier sculptures, wood provides the necessary stability and rigidity. You can combine wood with wire for additional support and detail.
- Metal: Offering exceptional strength and durability, metal armatures are ideal for large-scale or intricate sculptures that require exceptional support.
- Plastic: For lightweight sculptures, plastic tubing or foam can be used to create a simple and functional armature.
In the next session, we’ll dive deeper into the construction process, guiding you through the essential steps of creating an armature for your next clay masterpiece.
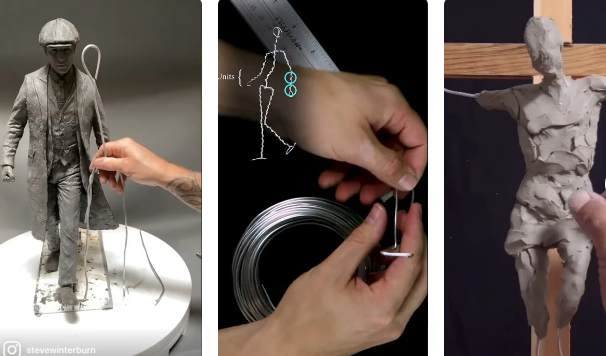
Session 2: Building Your Foundation: Demystifying Armature Construction
Now that you understand the significance of armatures in clay sculpting, it’s time to equip yourself with the knowledge and skills to build your own. This session serves as your guide, demystifying the construction process and empowering you to create a sturdy framework for your creative vision.
Understanding Armature Construction Principles:
- Planning and Design: Before diving into construction, sketch your desired sculpture or gather inspiration from images or existing artwork. This helps determine the size and complexity of your armature.
- Material Selection: Choose the appropriate material based on your sculpture’s size and complexity. Wire offers flexibility for most sculptures, while wood and metal provide increased strength for larger or heavier pieces.
- Joining Techniques: Securely connect the armature components using wire twisting, soldering, or epoxy glue, ensuring a strong and stable foundation.
- Posing and Shaping: Bend and shape the armature to create the desired pose and expression for your sculpture. Use reference images or anatomical studies for accuracy.
- Testing and Reinforcement: Before applying clay, test the armature’s stability and reinforce any weak points to prevent future issues.
Essential Tools and Materials:
- Wire cutters and pliers: For cutting and shaping wire
- Drill and drill bits (optional): For creating holes in wood or metal for attachment
- Soldering iron and solder (optional): For joining metal components
- Epoxy glue: For additional bonding strength
- Tape: For securing and holding wires in place
- Reference images or anatomical studies: For accurate posing and proportion
Building Your Armature Step-by-Step:
- Cut the wire or other chosen material to the desired lengths based on your sketch or plan.
- Bend and shape the wire to create the main form of the body, including the head, torso, limbs, and any other key elements.
- Use additional wire pieces to create the smaller details, such as fingers, toes, facial features, and any intricate elements.
- Securely connect the various parts of the armature using twisting, soldering, or glue, depending on your chosen material.
- Refine the pose and adjust the shape to achieve the desired expression and form.
- Test the armature’s stability by gently handling it and ensuring it can support the weight of the clay without bending or collapsing.
- Apply additional reinforcement with wire or other materials if needed to ensure the armature’s durability and support.
In the next session, we’ll delve into the practical application of armatures, exploring their role in sculpting various forms and providing techniques for successful clay application.
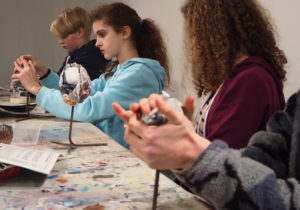
Session 3: Sculpting with Confidence: Mastering the Art of Clay Application
With a sturdy armature in place, you’re ready to embark on the exciting journey of clay application. This session guides you through the practical techniques and considerations to ensure a smooth and successful sculpting process.
Clay Application Techniques:
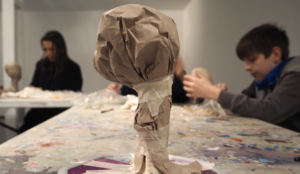
- Coiling: Roll out long coils of clay and attach them to the armature, gradually building up the desired shape and form.
- Slab Building: Flatten the clay into sheets and cut them into desired shapes, then attach them to the armature to create structures and features.
- Pinch Pots: Form basic shapes by pinching and molding clay between your fingers. This technique is ideal for creating simple forms like bowls, cups, or heads.
- Sculpting Tools: Utilize various sculpting tools like spatulas, brushes, and needles to refine and smooth the clay surface, add texture, and create intricate details.
Clay Considerations:
- Clay Type: Choose the clay type suited to your project. Air-dry clay is ideal for beginners, while polymer clay requires baking for permanence.
- Consistency: Ensure the clay is soft and pliable enough for easy shaping. Use water or slip (a liquid clay mixture) to keep the clay moist.
- Adhesion: Apply slip to the armature and clay surfaces to ensure proper adhesion and prevent cracking.
- Drying Time: Be mindful of the clay’s drying time and work in sections to avoid drying out the clay before completion.
Sculpting Specific Forms:
- Human Figures: Use anatomical references to accurately sculpt the body proportions and facial features. Build upon the armature, adding details like muscles, clothing, and accessories.
- Animals: Utilize reference images of specific animals to capture their unique features and expressions. Pay attention to their anatomy and movement to create realistic poses.
- Objects: Apply relevant sculpting techniques depending on the object’s complexity. Use reference images and experiment with different textures and details to enhance realism.
Enhancing Your Armature Sculpting Skills:
- Practice regularly: The more you practice, the more comfortable and confident you will become with the techniques and materials.
- Experiment with different tools and techniques: Explore various clay types, sculpting tools, and construction methods to find your preferred style and approach.
- Seek inspiration and feedback: Look at artwork by other clay sculptors and gather feedback from peers or instructors to continuously improve your skills.
- Embrace mistakes: View each mistake as a learning opportunity and use it to refine your techniques and achieve better results in future projects.
By following these guidelines and embracing the creative process, you can confidently sculpt diverse forms and bring your artistic vision to life using the invaluable support of your armature.
In the next session, we’ll wrap up our journey by addressing frequently asked questions and providing additional resources to empower your continued exploration of the fascinating world of clay sculpting with armatures.
Session 4: Cultivating Your Clay Sculpting Journey: FAQs and Resources
Having traversed the fundamentals of armature construction and clay application, this concluding session aims to further empower your artistic journey by addressing frequently asked questions and providing valuable resources to nurture your passion for clay sculpting with armatures.
FAQs:
Q: What type of wire is best for armatures?
A: The best wire type depends on your project. For smaller sculptures, galvanized steel wire or aluminum wire offer good flexibility and strength. For larger or heavier pieces, consider using thicker gauge wire or even copper wire for added durability.
Q: How do I secure the clay to the armature?
A: Apply slip (liquid clay) to both the armature and the clay before attaching them. This helps create a strong bond and prevents the clay from cracking or falling off.
Q: How long does it take for air-dry clay to dry completely?
A: Drying times vary depending on the thickness of the clay and the humidity levels. Generally, it can take 24-48 hours for small pieces to dry completely. Larger pieces may take several days.
Q: Can I bake polymer clay on my armature?
A: Yes, some armatures can withstand the baking temperatures required for polymer clay. However, it’s crucial to ensure your chosen armature material is oven-safe and can withstand the heat without melting or warping.
Q: Where can I find more inspiration and learning materials?
A: Explore the following resources to expand your knowledge and artistic repertoire:
- Online clay sculpting courses: Platforms like Udemy, Skill share, and Domestika offer diverse courses for beginners and advanced clay sculptors.
- Clay sculpting books and magazines: Discover instructional books and magazines filled with techniques, tutorials, and artist profiles.
- Clay sculpting communities and forums: Connect with other clay enthusiasts online to share your work, ask questions, and receive valuable feedback.
- Art museums and galleries: Visit exhibitions featuring clay sculptures to gain inspiration from established artists and explore diverse styles and techniques.
Remember, the journey of clay sculpting is continuous. Embrace the challenges, celebrate your successes, and never stop learning and exploring. With dedication, practice, and the utilization of valuable resources, you can cultivate your artistic vision and create stunning clay masterpieces using the powerful foundation of armatures.