Table Of Contents
- 1 The Enchanting World of Polymer Clay: Unveiling its Creative Potential
- 2 Session 2: Deciphering the Tools and Techniques of Polymer Clay Sculpting
- 3 Session 3: Sculpting Your Imagination: A Hands-On Guide to Polymer Clay Creations
- 4 Session 4: Celebrating Your Creations: A Recap and FAQs
- 4.1 Key Takeaways:
- 4.2 Frequently Asked Questions:
- 4.3 Q: Do I need any prior experience to start sculpting with polymer clay?
- 4.4 Q: What are the essential tools for polymer clay sculpting?
- 4.5 Q: How do I ensure my polymer clay sculptures are durable?
- 4.6 Q: Can I paint my polymer clay sculptures?
- 4.7 Q: How can I share my polymer clay creations with the world?
The Enchanting World of Polymer Clay: Unveiling its Creative Potential
Sculpting with polymer clay opens a gateway to a captivating world of artistic expression, accessible to individuals of all skill levels. This versatile material, with its endless possibilities and vibrant colors, invites you to embark on a creative journey of shaping your imagination into tangible reality.
In this session, we’ll take the first step into this enchanting world, exploring the unique characteristics and transformative power of polymer clay.
What is Polymer Clay?
Unlike air-dry clay, which hardens when exposed to air, polymer clay remains soft and pliable until baked in an oven. This unique property allows for greater flexibility during the sculpting process, enabling you to make adjustments and refine your creations as you go. Additionally, its lightweight nature makes finished sculptures surprisingly manageable and easy to display.
A Rainbow of Possibilities:
Polymer clay comes in a breathtaking array of colors, ranging from vibrant hues to subtle earth tones and even metallic and pearlescent shades. This vast palette empowers you to bring your creative visions to life with the exact colors and textures you desire.
Beyond Colors:
The versatility of polymer clay extends beyond its mesmerizing colors. You can mix different colors to create custom shades and gradients, adding depth and dimension to your sculptures. Additionally, numerous techniques like cane making, mica shifting, and texturing offer endless opportunities for creating intricate patterns, mesmerizing effects, and unique textures.
Sculpting Techniques:
Polymer clay readily adapts to various sculpting techniques, allowing you to explore and discover your preferred style. Whether you’re drawn to the simplicity of pinch pottery, the intricate details achieved through coil building, or the artistic freedom of sculpting tools, polymer clay caters to your creative inclinations.
In the next session, we’ll delve deeper into the practicalities of sculpting with polymer clay, exploring essential tools, techniques, and basic project ideas to inspire your creative journey.
Session 2: Deciphering the Tools and Techniques of Polymer Clay Sculpting
Having explored the captivating world of polymer clay and its vibrant possibilities, let’s delve into the practicalities of sculpting with this versatile material. This session will equip you with the essential knowledge of tools, techniques, and basic project ideas to ignite your artistic journey.
Tools of the Trade:
Your polymer clay sculpting toolbox doesn’t need to be extensive, but having some essential tools can significantly enhance your experience. Here are some key items to consider:
- Rolling Pin: Flattens and smooths the clay, preparing it for various techniques like coil building and slab construction.
- Sculpting Knives and Tools: A variety of knives and tools like spatulas, brushes, and needle tools allow you to carve, cut, shape, and add intricate details to your clay creations.
- Ribs and Sponges: Smooth and refine the surface of your sculptures, eliminating unwanted fingerprints and marks.
- Texturing Tools: These tools imprint patterns and textures onto the clay, adding visual interest and dimension to your sculptures.
- Work Surface: A smooth, non-stick surface, like a glass or ceramic tile, is ideal for working with polymer clay.
- Oven and Baking Sheet: Baking is essential for curing your clay creations, ensuring their durability.
Sculpting Techniques at Your Fingertips:
Polymer clay readily adapts to various sculpting techniques, offering diverse avenues for creative expression. Here are some fundamental techniques to get you started:
- Pinch Potting: This simple yet versatile technique involves shaping the clay with your fingers, creating hollow forms like mugs, bowls, and vases.
- Coil Building: By joining long, rolled-out coils of clay, you can build sculptures of any size and complexity, adding intricate details and unique textures.
- Slab Construction: This method uses flat sheets of clay cut and shaped to create structures, wall hangings, and decorative panels.
- Modeling: Using sculpting tools like spatulas, brushes, and knives, you can refine and detail your clay creations, adding expression and individuality to your sculptures.
Let’s Get Creative: Project Ideas for Beginners:
Ready to put your newfound knowledge into practice? Here are some basic project ideas to kickstart your polymer clay sculpting journey:
- Beads and Jewelry: Create colorful and unique beads for necklaces, bracelets, and earrings.
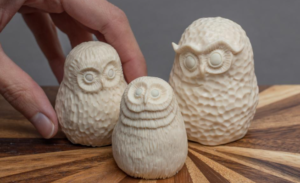
- Miniature Sculptures: Sculpt small figurines, animals, or objects, adding charming details and personality.
- Decorative Buttons: Design and bake colorful and unique buttons to personalize your clothing and accessories.
- Magnets and Keychains: Craft adorable magnets or keychains featuring your favorite characters or designs.
- Home Decor Accents: Create decorative bowls, coasters, or wall hangings to add a personal touch to your living space.
Remember, these are just a few starting points. As you explore and experiment, you’ll discover a boundless world of creative possibilities within the realm of polymer clay sculpting.
In the next session, we’ll embark on a hands-on journey, guiding you through the creation of your first polymer clay masterpiece.
Session 3: Sculpting Your Imagination: A Hands-On Guide to Polymer Clay Creations
Now, armed with knowledge and inspiration, it’s time to embark on the hands-on adventure of crafting your first polymer clay masterpiece. This session will guide you step-by-step through the creation process, empowering you to bring your artistic vision to life.
Getting Started:
- Gather your materials: You’ll need polymer clay in your desired colors, a rolling pin, sculpting tools like knives and sponges, a smooth work surface, and an oven with a baking sheet.
- Conditioning the clay: Warm the clay in your hands or with a hair dryer on low heat until it becomes soft and pliable. This ensures smooth and easy shaping.
Crafting a Pinch Pot:
- Form a ball: Roll the clay into a ball, ensuring its size and shape reflect your desired final pot size.
- Start pinching: Use your thumb and fingers to gently pinch the center of the ball, creating a hollow space.
- Gradually thin the walls: As you pinch further, gradually thin the walls of the pot, maintaining an even thickness throughout.
- Shape the rim: Use your fingers to shape the rim of the pot into your desired form, whether rounded, flared, or textured.
- Smooth and refine: Use a wet sponge to smooth the surface of the pot and eliminate any fingerprints or unevenness.
Adding Details and Embellishments:
- Scoring and slip: If you wish to add attachments or decorations, score both surfaces where they will meet with a knife and apply a thin layer of slip (liquid polymer clay) to ensure a strong bond.
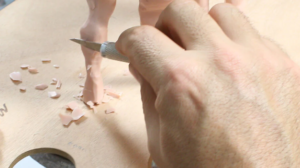
- Carving and texturing: Once the clay is firm enough, use sculpting tools to carve designs, patterns, or textures onto your pot.
- Embeds and inclusions: You can embed small objects like beads, buttons, or dried flowers into the clay for added visual interest and texture.
Baking and Finishing Touches:
- Carefully transfer your creation to a baking sheet.
- Bake according to the manufacturer’s instructions. Baking times typically vary depending on the clay brand and thickness of your sculpture.
- Once baked, let your creation cool completely.
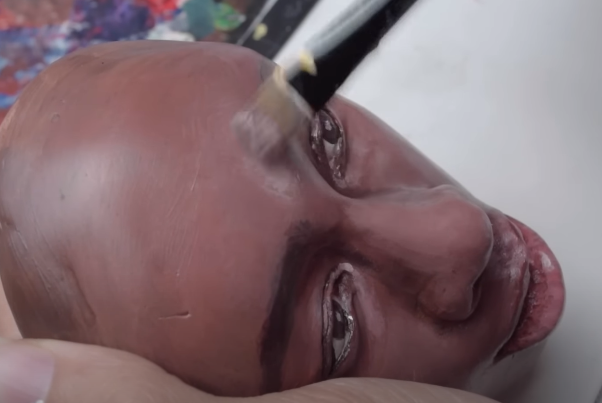
- You can add finishing touches like paint, varnish, or glitter to further personalize your masterpiece.
Unleashing Your Creativity:
This is just the beginning of your polymer clay sculpting journey. As you experiment with different techniques, colors, and tools, you’ll discover your unique creative voice and explore the boundless possibilities within this captivating art form.
Here are some additional tips to enhance your polymer clay sculpting experience:
- Work in a well-ventilated area.
- Don’t be afraid to experiment and make mistakes.
- Clean your tools regularly to prevent them from drying out.
- Store your unused polymer clay in an airtight container.
- Take inspiration from other artists and online resources.
Remember, sculpting with polymer clay is a fun and rewarding activity. Embrace the creative process, enjoy the journey, and let your imagination guide you as you shape your artistic vision into reality.
In the next session, we’ll review the key takeaways and answer frequently asked questions to empower you on your creative journey with polymer clay.
Session 4: Celebrating Your Creations: A Recap and FAQs
As we conclude our exploration of the enchanting world of polymer clay sculpting, let’s recap the key takeaways and address frequently asked questions to empower you on your creative journey.
Key Takeaways:
- Polymer clay offers a versatile, beginner-friendly, and accessible medium for sculpting, ideal for individuals of all skill levels.
- Essential tools like rolling pins, sculpting knives, sponges, and texturing tools facilitate shaping, detailing, and adding textures to your creations.
- Techniques like pinch potting, coil building, and slab construction allow you to build diverse and expressive sculptures, from simple forms to intricate figures.
- Experimenting with colors, techniques, baking temperatures, and finishing touches empowers you to personalize your clay creations and add your unique artistic voice.
- Polymer clay sculpting fosters creativity, mindfulness, skill development, and a sense of accomplishment, enriching your artistic expression and personal well-being.
Frequently Asked Questions:
Q: Do I need any prior experience to start sculpting with polymer clay?
A: No prior experience is necessary! Polymer clay is a beginner-friendly medium, and numerous resources and tutorials are readily available to guide your learning and experimentation.
Q: What are the essential tools for polymer clay sculpting?
A: While a few basic tools are recommended, you can find beginner kits that offer a good starting point. Essential tools include a rolling pin, sculpting knives, sponges, and texturing tools.
Q: How do I ensure my polymer clay sculptures are durable?
A: Proper baking is crucial for durability. Follow the manufacturer’s instructions for baking times and temperatures specific to your chosen clay brand and the thickness of your sculptures.
Q: Can I paint my polymer clay sculptures?
A: Yes, you can! Once your sculptures have been baked and cooled, you can paint them with acrylic paints or other suitable mediums. Applying a varnish adds an extra layer of protection and enhances the finish.
A: Participate in online communities, art shows, or local craft fairs to showcase your work and connect with other artists. Sharing your creations provides valuable feedback and inspiration, fostering your artistic growth.
Embrace the journey of polymer clay sculpting with an open mind, a playful spirit, and a willingness to experiment. Embrace the transformative power of this versatile material, and discover the joy of creating unique and lasting art pieces. With dedication and passion, you’ll unlock the boundless creative potential that lies within the world of polymer clay.
Remember, the journey is just as important as the destination. Enjoy the process, learn from your experiences, and don’t be afraid to push boundaries and embrace the unexpected. As you continue your sculpting journey, you’ll uncover a world of endless possibilities and create beautiful and captivating masterpieces that reflect your unique artistic voice.
1 thought on “Sculpting With Polymer Clay”