
Navigating the Challenges of Kiln Firing
Introduction:
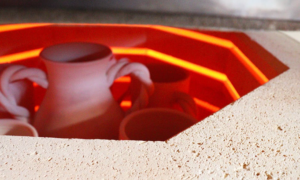
In the realm of ceramics, the path to crafting exquisite works of art is often paved with unexpected challenges. Kiln firing, a crucial step in the ceramic process, can present a myriad of issues that can hinder the transformation of delicate clay sculptures into durable masterpieces. From cracking and warping to blistering and over firing, these imperfections can frustrate even the most experienced ceramic artists.
This comprehensive guide delves into the world of troubleshooting common kiln firing issues, empowering you with the knowledge and techniques to overcome these obstacles and achieve the desired aesthetic outcome for your ceramic creations. Through a thorough understanding of the underlying causes and effective remedies, you will gain the mastery to navigate the intricacies of kiln firing with confidence.
As you embark on this journey of mastering kiln firing, it is essential to have a firm grasp of the fundamental principles involved in this delicate process. By understanding the chemical and physical transformations that occur within the clay as it undergoes various stages of heating and cooling, you will gain a deeper appreciation for the nuances of kiln firing and the factors that can contribute to common issues.
In the following sessions, we will explore the intricacies of kiln firing, delving into the causes, consequences, and practical solutions to common firing problems. We will unravel the mysteries of cracking, warping, blistering, over firing, and under firing, arming you with the knowledge to diagnose and rectify these issues.
Throughout this guide, you will discover essential tips and techniques for ensuring successful kiln firings, enabling you to transform your clay creations into enduring masterpieces that reflect your artistry and craftsmanship.
Session 2: Unveiling the Mysteries of Kiln Firing Issues
Subheading:
- Cracking: Unraveling the Causes and Consequences of Cracking in Kiln-Fired Ceramics
Cracking, a prevalent issue in kiln firing, manifests in the form of hairline fractures or visible splits on the surface of the ceramic piece. This undesirable outcome can stem from a multitude of factors, including uneven heat distribution, rapid temperature fluctuations, and excess moisture in the clay.
Uneven heat distribution, often caused by faulty kiln elements or improper kiln shelf placement, can lead to localized stress within the clay, causing it to crack under the pressure. Rapid temperature changes, whether during the heating or cooling phase, can also induce stress fractures, particularly in delicate pieces. Excess moisture trapped within the clay expands during firing, resulting in internal pressure that can cause the piece to crack.
Consequences of Cracking:
Cracking not only detracts from the aesthetic appeal of a ceramic piece but can also compromise its structural integrity. Cracks can weaken the piece, making it more susceptible to breakage and reducing its overall lifespan. In severe cases, cracking can render a ceramic piece unusable.
Preventive Measures:
To effectively combat cracking, several strategies can be implemented:
-
Ensure Complete Clay Dryness: Thoroughly drying the clay before firing eliminates excess moisture, reducing the risk of cracking during the firing process.
-
Monitor Kiln Temperature: Closely monitor the kiln temperature using a kiln controller to maintain even heat distribution and prevent rapid temperature fluctuations.
-
Support Fragile Sections: Employ kiln posts or props to reinforce delicate or fragile sections of the ceramic piece, providing additional support during firing.
-
Use Appropriate Kiln Shelves: Choose kiln shelves that are the correct size and material for the ceramic piece to ensure even heat distribution and prevent warping.
-
Gradual Cooling: Allow the kiln to cool gradually after firing to minimize thermal stress and prevent cracking.
Additional Tips:
-
Consult the manufacturer’s instructions for specific clay drying and firing recommendations.
-
Experiment with different firing schedules to find the optimal settings for your clay and desired outcome.
-
Regularly inspect kiln elements for signs of wear or damage.
-
Use a kiln sitter or controller to maintain precise temperature control throughout the firing process.
By adhering to these preventive measures and following additional tips, you can significantly reduce the occurrence of cracking in your kiln-fired ceramics, ensuring the integrity and aesthetic appeal of your creations.
Session 3: Mastering the Art of Kiln Firing: Tackling Common Issues with Expertise
- Warping: Exploring the Causes and Consequences of Warped Ceramics
War.
Session 3: Mastering the Art of Kiln Firing: Tackling Common Issues with Expertise
Title: Conquering the Challenges of Kiln Firing: A Comprehensive Guide to Troubleshooting and Achieving Ceramic Excellence
Subheading:
Warping: Exploring the Causes and Consequences of Warped Ceramics
Warping, a distortion in the shape or form of a ceramic piece, can significantly diminish its aesthetic appeal and functionality. This issue often arises from uneven heat distribution, improper firing schedules, and the use of unsuitable kiln shelves.
Causes of Warping:
-
Uneven Heat Distribution: As mentioned earlier, uneven heat distribution within the kiln can cause localized shrinkage or expansion within the clay, leading to warping. This can be attributed to faulty kiln elements, improper kiln shelf placement, or excessive loading of the kiln.
-
Improper Firing Schedules: Rapid heating or cooling rates can also induce warping, particularly in delicate pieces. Abrupt temperature changes can create stress within the clay, causing it to deform or twist out of shape.
-
Inappropriate Kiln Shelves: Using kiln shelves that are too small or too large for the ceramic piece can also induce warping due to uneven support. Additionally, the type of kiln shelf material can influence warping, with glazed shelves being more prone to warping than unglazed ones.
Consequences of Warping:
Warped ceramic pieces not only detract from their visual appeal but can also hinder their intended use. Warping can make it difficult to stack or display ceramic pieces, and in severe cases, it can render them unusable.
Preventive Measures:
To effectively prevent warping, several strategies can be implemented:
-
Ensure Even Heat Distribution: Utilize a kiln controller to monitor and regulate the kiln temperature, ensuring even heat distribution throughout the firing process.
-
Follow Proper Firing Schedules: Adhere to the recommended firing schedules for your specific clay type and desired outcome. Avoid overly rapid heating or cooling rates.
-
Use Appropriate Kiln Shelves: Choose kiln shelves that are the correct size and material for the ceramic piece to ensure even heat distribution and prevent warping.
-
Proper Load Distribution: Load the kiln evenly to distribute weight distribution and minimize the risk of warping. Avoid overloading the kiln, as this can also contribute to uneven heat distribution.
-
Gradual Cooling: Allow the kiln to cool gradually after firing to minimize thermal stress and prevent warping.
-
Ventilate the Kiln: Proper ventilation within the kiln can help to regulate temperature and prevent warping.
-
Kiln Furniture: Utilize kiln furniture, such as kiln posts and props, to support delicate or fragile sections of the ceramic piece during firing.
Additional Tips:
-
Consult the manufacturer’s instructions for specific clay and firing recommendations.
-
Experiment with different firing schedules to find the optimal settings for your clay and desired outcome.
-
Regularly inspect kiln elements for signs of wear or damage.
-
Use a kiln sitter or controller to maintain precise temperature control throughout the firing process.
By implementing these preventive measures and following additional tips, you can significantly reduce the occurrence of warping in your kiln-fired ceramics, enhancing the aesthetic quality and functionality of your creations.
Session 4: Embracing Perfection: A Comprehensive Guide to Troubleshooting and Achieving Ceramic Excellence
Blistering: Unveiling the Causes and Consequences of Blistering in Kiln-Fired Ceramics
Blistering, characterized by raised, bubble-like formations on the surface of a ceramic piece, can detract from its overall aesthetic appeal and integrity. This issue primarily arises from trapped air bubbles within the clay, which expand during firing, causing the surface to blister.
Causes of Blistering:
-
Air Bubbles in the Clay: Improper kneading of the clay can leave air bubbles trapped within the clay structure. These air bubbles expand during firing, creating the blisters.
-
Rapid Heating or Cooling: Rapid temperature changes during firing can also induce blistering, as the air bubbles expand or contract rapidly, causing the surface to rupture.
-
High Moisture Content: Clay with a high moisture content can be more susceptible to blistering, as the water vapor expands during firing, creating bubbles.
Consequences of Blistering:
Blisters not only mar the aesthetic appearance of ceramic pieces but can also compromise their structural integrity. The blisters can weaken the surface, making it more prone to chipping or flaking. In severe cases, blisters can cause the ceramic piece to crack or shatter.
Preventive Measures:
To effectively prevent blistering, several strategies can be implemented:
-
Thorough Kneading: Thoroughly knead the clay to remove air bubbles trapped within the structure.
-
Slow Heating and Cooling: Maintain a slow and steady heating and cooling schedule during firing to minimize the expansion or contraction of air bubbles.
-
Proper Drying: Ensure that the clay is completely dry before firing to remove excess moisture that can contribute to blistering.
-
Reduce Moisture Content: If using a high-moisture clay, consider pre-firing the clay to remove some of the moisture content.
- Use a Kiln Sitter or Controller: A kiln sitter or controller can help to maintain a consistent firing temperature, reducing the risk of rapid temperature fluctuations that can induce blistering.
1 thought on “The Challenges Of Kiln Firing”